Working with Direct File Uploads
Introduction
The Procore API supports the capability to post and store files directly in a web file storage service. Using the Procore API to directly upload content to a storage service helps to streamline uploads and reduces upload latency. Uploading a file using the Procore API is generally a two-step process. The first step to storing files directly from your application to your file storage service is to create an upload at the company or project level using the Create Company Upload or Create Project Upload endpoints respectively. File uploads can be either segmented or non-segmented. The JSON block returned by these endpoints contains attributes that form the ‘instructions’ for uploading and storing files. Subsequent steps use these attributes to form a POST request to the file storage service. Once a file has been uploaded to a storage service you can use the Procore API to move the file into Procore and associate it with a resource. See Moving an Uploaded File into Procore for additional information.
Upload Endpoints
The Procore API provides the following endpoints for creating Uploads at the company and project levels.
| Action | Endpoint URI | Description |
|---|---|---|
| Create Upload (Company Level) | POST /rest/v1.1/companies/{company_id}/uploads | Creates a new Upload in the specified Company. |
| Create Upload (Project Level) | POST /rest/v1.1/projects/{project_id}/uploads | Creates a new Upload in the specified Project. |
Segmented Direct File Uploads
The Create Upload endpoints support segmented file uploads. Here are the steps for performing a segmented upload.
Step 1 - Prepare the File Segment(s)
The first step in performing a segmented file upload is to determine the number of file segments that will be uploaded. Each file segment has a minimum size of 5MB and a maximum size of 5GB, except for the last segment in a multi-segment upload. A SHA-256 hash must be provided with each file segment so Procore can calculate the signature for each upload. In addition, an MD5 checksum can optionally be computed and provided with each file segment so that the storage provider can verify the data integrity of each uploaded segment.
Here is a basic example of preparing the segments for an 8.8MB video file.
First, we use the split command to divide the original source file into multiple segments.
split -b 6000000 test-video-file.mp4 file-segment
where -b 6000000 specifies the number of bytes for the minimum segment size (at least 5MB as required), test-video-file.mp4 is the name of the file to split, and file-segment is the prefix that will be used for naming the segments.
Running this command results in two file segments being created.
6000000 Mar 25 14:57 file-segmentaa
2829449 Mar 25 14:57 file-segmentab
The first file segment has the 6000000 minimum byte size we specified in the command (approx. 6MB), while the second (last) segment is 2829449 bytes (approx. 2.8MB).
Although file upload segments must be a minimum of 5MB, the last segment in the series can be smaller as it holds the remainder of the bytes after the original file has been divided equally by the specified segment size.
The segments are named using the prefix we specified in the command - file-segmentaa and file-segmentab.
Step 2 - Create a Segmented Upload
To help illustrate the workflow for this example we use the Create Upload endpoint to create a new segmented upload at the company level. A sample POST request to the Create Company Upload endpoint would take the following format:
- Request Method:
POST - Request URL:
https://api.procore.com/rest/v1.1/companies/{company_id}/uploads - Request Body: An array of file segment information with each segment containing
size(in bytes),sha256(sha-256 hash),md5(optional md5 checksum).
Note: There are a variety of command line tools available for checking the sha256 hash and md5 checksum values for files.
Use the tools appropriate for your operating system.
Example Request Body
{
    "segments": [
        {
        "size": 6000000,
        "sha256": "b2a6304fdd19da95f8750573f5fd33e0ad71c3a41b1b6daaf4621fd9af913952",
        "md5": "65fa016357a18272ce086ff4694ba61a"
        },
        {
        "size": 2829449,
        "sha256": "9b9ffee440b0936c280d49f42ceb554eb3bf404b0604e95da1783bc3d64d58e7",
        "md5": "08758729c38f3081b9d0bbe6b0de41fa"
        }
    ]
}
Response Body
The response will include the UUID for the file, and the specific information required to upload each file segment to the third-party storage service.
UUID - the unique identifier for the binary file
Segments - array of file segment information containing:
- MD5 - the MD5 checksum for the file segment
- SHA256 - the SHA-256 hash of the file segment
- Size - the file segment size in bytes
- URL - the upload host url of the third party storage service
- Headers - the required request headers to upload the segment
Status - the current status of the direct file upload
Example:
{
    "uuid": "01FZ8QATJYD0K7BZG2PP5GB4KN",
    "segments": [
        {
            "md5": "65fa016357a18272ce086ff4694ba61a",
            "sha256": "b2a6304fdd19da95f8750573f5fd33e0ad71c3a41b1b6daaf4621fd9af913952",
            "size": 6000000,
            "url": "https://s3.amazonaws.com/pro-core.com/companies/xyz/...",
            "headers": {
                "x-amz-content-sha256": "b2a6304fdd19da95f8750573f5fd33e0ad71c3a41b1b6daaf4621fd9af913952",
                "content-length": "6000000",
                "content-md5": "ZfoBY1ehgnLOCG/0aUumGg=="
            }
        },
        {
            "md5": "08758729c38f3081b9d0bbe6b0de41fa",
            "sha256": "9b9ffee440b0936c280d49f42ceb554eb3bf404b0604e95da1783bc3d64d58e7",
            "size": 2829449,
            "url": "https://s3.amazonaws.com/pro-core.com/companies/xyz/...",
            "headers": {
                "x-amz-content-sha256": "9b9ffee440b0936c280d49f42ceb554eb3bf404b0604e95da1783bc3d64d58e7",
                "content-length": "2829449",
                "content-md5": "CHWHKcOPMIG50LvmsN5B+g=="
            }
        }
    ],
    "status": "ready"
}
Step 3 - Upload File Segment(s) to Storage Service
After successfully creating a new upload, the next step is to upload all the file segments to the third-party storage provider. The response from Create Upload in the previous step includes the required URL and header values for each segment that must be sent to the storage provider with each upload request. An eTag is returned in the response for each segment upload. We’ll need to keep each eTag value for the next step.
Request
- Request Method:
PUT - Request URL: Segment
urlvalue from the create upload response - AUTH: None
- Request Headers: Segment
headervalues (x-amz-content-sha256,content-length, andcontent-md5) from the create upload response - Request Body: File segment as binary data - include
Content-Type:application/octet-streamin the request header so that the storage service treats the file as arbitrary binary data.
Response
Success will be an HTTP: 200 with no content or body. Response headers will contain the eTag.
Step 4 - Complete the Upload
Now that all the file segments have been uploaded to the storage provider, we need to notify Procore that we are done uploading the file.
We use both the file’s UUID and the collection of file segment eTags to do this.
Request
- Request Method:
PATCH - Request URL:
/rest/v1.1/companies/{company_id}/uploads/{uuid} - AUTH: Procore Bearer Token
- Request Body: Array of file segment eTags values retrieved from the response headers in the previous step.
Note: the order of the eTags in the request body must be in the same order as the segments returned in the Create Upload request in Step 1.
Example Request Body
 {
    "segments": [
        {
        "etag": "65fa016357a18272ce086ff4694ba61a"
        },
        {
        "etag": "08758729c38f3081b9d0bbe6b0de41fa"
        }
    ]
}
Response
UUID - the unique identifier for the binary file Segments - array of file segment information containing:
- MD5 - the MD5 checksum of the file segment
- SHA256 - the SHA-256 hash of the file segment
- Size - the segment file size in bytes
- URL - the upload host url of the third-party storage service
- Headers - the required request headers to upload the segment
Status - complete status should be returned
Example Response Body
{
    "uuid": "01FZ8QATJYD0K7BZG2PP5GB4KN",
    "segments": [
        {
            "etag": "65fa016357a18272ce086ff4694ba61a",
            "md5": "65fa016357a18272ce086ff4694ba61a",
            "sha256": "b2a6304fdd19da95f8750573f5fd33e0ad71c3a41b1b6daaf4621fd9af913952",
            "size": 6000000,
            "url": "https://s3.amazonaws.com/pro-core.com/companies/xyz...",
            "headers": {
                "x-amz-content-sha256": "b2a6304fdd19da95f8750573f5fd33e0ad71c3a41b1b6daaf4621fd9af913952",
                "content-length": "6000000",
                "content-md5": "ZfoBY1ehgnLOCG/0aUumGg=="
            }
        },
        {
            "etag": "08758729c38f3081b9d0bbe6b0de41fa",
            "md5": "08758729c38f3081b9d0bbe6b0de41fa",
            "sha256": "9b9ffee440b0936c280d49f42ceb554eb3bf404b0604e95da1783bc3d64d58e7",
            "size": 2829449,
            "url": "https://s3.amazonaws.com/pro-core.com/companies/xyz/...",
            "headers": {
                "x-amz-content-sha256": "9b9ffee440b0936c280d49f42ceb554eb3bf404b0604e95da1783bc3d64d58e7",
                "content-length": "2829449",
                "content-md5": "CHWHKcOPMIG50LvmsN5B+g=="
            }
        }
    ],
    "status": "complete"
}
Step 5 - Associate File to a Procore Resource
Now that the binary file has been successfully uploaded to the storage provider, it needs to be associated with a Procore resource.
This is done by using the relevant Procore endpoint to create an item, but instead of adding the binary file to the request we use the file’s UUID retrieved from the previous step.
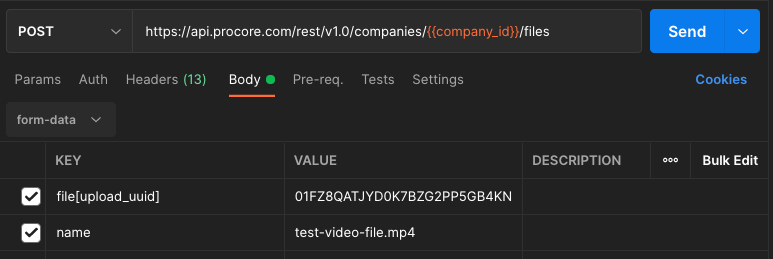
Here is an example of adding a company file to the Documents tool using the UUID.
Including the name field is helpful as this allows you to specify the exact file name that will appear in the Documents tool.
Non-Segmented Direct Uploads
For smaller file uploads you can perform a non-segmented direct upload using the steps outlined below.
Step 1: Create an Upload
To help illustrate the workflow for this example we use the Create Upload endpoint to create a new upload at the company level. A sample POST request to the Create Company Upload endpoint would take the following format:
- Request Method:
POST - Request URL:
https://api.procore.com/rest/v1.1/companies/{company_id}/uploads - Request Body :
{ "response_filename": "example.pdf", "response_content_type": "application/pdf" }
Including the response_filename in the request body ensures that the storage service is aware of the filename for the upload in advance.
Since files are often downloaded directly from the storage service, specifying the response_filename ensures that the file will save on an end user’s device with a meaningful name and extension.
Similarly, specifying the response_content_type is helpful when you want to make sure the file extension is correct or if you want to ‘force’ a file content type that differs from the extension.
Executing a successful call to the Create Uploads endpoint returns a JSON response similar to the following:
{
    "uuid": "01EJCD78RY2DR3B51N6E9T2C0R",
    "url": "https://s3.amazonaws.com/pro-core.com",
    "fields": {
        "key": "companies/1234/1R3WZFQ71234CX5TBZ6NRYEC21",
        "Content-Type": "application/pdf",
        "Content-Disposition": "inline; filename=\"example.pdf\"",
        "policy": "eyJleHBpcmF0aW9uIjoiMjAxOC0xMS0yMFQwMDo0ODoxNV...==",
        "x-amz-credential": "AKIAINQYGICB5222SEHQ/20181119/us-east-1/s3/aws4_request",
        "x-amz-algorithm": "AWS4-HMAC-SHA256",
        "x-amz-date": "20181119T234815Z",
        "x-amz-signature": "ab9e2f7328111c46c31cd65e88efc5f55fc80efb9ff925adc4e68572478e1234"
    }
}
The example JSON response above includes three properties, two (url and fields) that we’ll use as ‘instructions’ for performing a direct file upload in the next step.
- uuid - a unique identifier referencing the upload. (not used when uploading file data but used to reference the file after uploading)
- url - the uniform resource locator (URL) used to POST the file upload. In this example, the URL points to Procore’s AWS S3 storage area but this may change in the future.
- fields - required attributes that must be included with the file upload in Step 2.
Step 2: Upload File to a Storage Service Using HTTP POST Request
Once we have successfully created an Upload (as described in the previous step), we use the data returned in the JSON response to construct a POST request to the storage service (AWS S3 for this example) that includes the file we want to upload along with the url and fields retrieved in Step 1 as form data.
Note that in this example we are using “https://s3.amazonaws.com/pro-core.com” as the value for the url attribute, but your url attribute value will be different depending on the storage service location you are targeting.
Be sure to use the exact url value returned from the call to the Create Uploads endpoint.
We’ll use Postman to demonstrate this step, as it provides a convenient framework for setting up a payload as form data for a POST request.
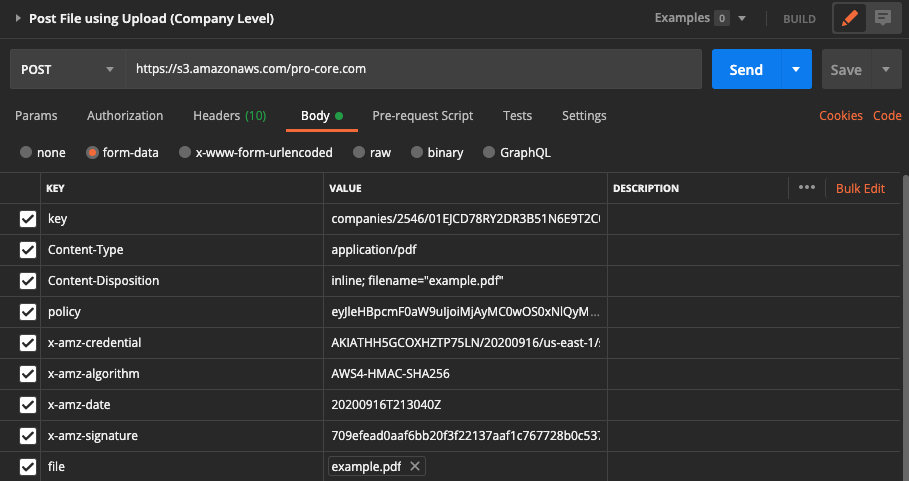
Examining the illustration above we see that the HTTP action is set to POST and that we’ve entered https://s3.amazonaws.com/pro-core.com as the target URL for our file storage service.
Next, we build up the Body for the request payload configured as form-data.
We include all parameter values from fields, and specify the file to upload using the Choose Files button.
Note that you must use file as the Key name for specifying the file to upload.
Remember that all values you define in the request payload must match those returned from the Create Upload endpoint. Choosing the Send button submits the POST request with the payload we’ve defined.
Returned status codes in the 4xx and 5xx range indicate a problem with the request.
IMPORTANT CONSIDERATIONS
- You must initiate a direct file upload within one hour from the time you retrieve data from the Create Upload endpoint(s), or you can expect a 403 Forbidden response and must call Create Upload again.
- The currently authenticated user becomes the owner of the Upload and only that user can use the Upload in subsequent requests.
- The URL and fields necessary to complete a direct file upload may vary between companies and may also change over time so none of these may be hard-coded.
- Uploads must be associated with a Procore resource within one week or it will be automatically deleted from Procore servers.
- Be sure not to include your access token in this request as it will result in an error. Bear in mind that this request is pointing to the AWS server and not the Procore Server.
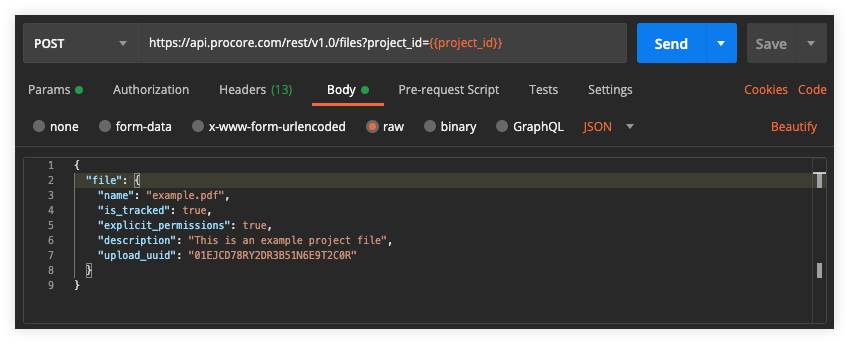
Moving an Uploaded File into Procore
Once a file has been successfully uploaded to a storage service, we can move the file into Procore and associate it with a resource. This example shows using the Create Project File endpoint to move the file into Procore as a project document file.
The following endpoints may also be used to move uploaded files into Procore depending on your use case.
Using upload id in API Requests
This section provides examples of how to use the upload id when integrating with various Procore endpoints.
What is upload_id?
The upload_id refers to a unique identifier created during Procore’s direct S3 upload process.
This identifier represents a file that has been uploaded directly to Amazon S3 storage.
When a file is uploaded via the direct S3 method:
- An upload record is created with a upload_id
- The file is uploaded directly to S3 from the client
- The upload_id can then be referenced in subsequent API calls to associate the file with specific Procore resources
IMPORTANT CONSIDERATIONS
The system is designed to maintain compatibility with both new direct uploads using upload_id and the legacy approach, but the upload_id method is strongly preferred for new implementations due to its superior performance and resilience characteristics.
Example-1: Using Upload id with Action Plans
When creating a test record attachment in the Action Plans tool, you can reference your uploaded file using its id:
- Request Method:
POST - Request URL:
/rest/v1.0/projects/1/action_plans/plan_test_records - Request Body:
{
  "plan_test_record": {
    "plan_item_id": 54,
    "plan_test_record_request_id": 42,
    "type": "attachment",
    "payload": {
      "attachment": {
        "upload_id": "01JN2W87CCGXZBJFTW5YEDSPRRR"
      }
    }
  }
}
Response Body
{
  "id": 128,
  "created_at": "2025-02-28T09:12:13Z",
  "payload": {
    "attachment": {
      "id": 540,
      "content_type": null,
      "name": "test_filename",
      "thumbnail_url": null,
      "url": "http://storage.procore.com/api/v5/files/us-east-1/pro-core.com-staging/companies/2/01JN2W87CCGXZBJFTW5YEDSPRRR?companyId=2&projectId=1&sig=e947909ff7f84d3b279af3059frd049339262d0eac9f1bfa7170702f1899a2560c",
      "viewer_url": "/webclients/host/companies/2/projects/1/tools/document-viewer/prostore/540?item_id=128&item_type=ActionPlans::Plan::TestRecord&parent_id=6&plan_item_id=49&fullscreen"
    }
  },
  "plan_id": 6,
  "plan_item_id": 49,
  "plan_test_record_request_id": 50,
  "type": "attachment",
  "updated_at": "2025-02-28T09:12:13Z"
}
Example-2: Using Upload id with Meeting Topics
You can create and update Meeting Topics with file attachments by referencing the upload id:
Creating a Meeting Topic with an attachment:
- Request Method:
POST - Request URL:
/rest/v1.1/projects/{project_id}/meeting_topics - Request Body:
{
    "meeting_id": 538,
    "meeting_topic": {
        "title": "Creating a meeting topic with upload_ids",
        "description": "Fresh Create Meeting Topic with upload_ids",
        "upload_ids": ["01JNNGH4ZPX76PVYJX10A0Y5N9"]
    }
}
- Response Body
{
    "id": 535,
    "number": "1.5",
    "created_on": "2025-03-06",
    "position": 5,
    "due_date": null,
    "priority": null,
    "status": "Open",
    "title": "Creating a meeting topic with upload_ids",
    "minutes": null,
    "description": "Fresh Create Meeting Topic with upload_ids",
    "meeting_category": {
        "id": 202,
        "title": "Uncategorized Items"
    },
    "assignments": [],
    "attachments": [
        {
            "id": 971407,
            "filename": "test_filename",
            "name": "test_filename",
            "url": "http://storage.procore.com/api/v5/files/us-east-1/pro-core.com-staging/companies/2/01JNNGH4ZPX76PVYJX10A0Y5N9?companyId=2&projectId=1&sig=564988041be708bfda9c52ccc0074809b18fb7f0c629a25d6798375b7223c618"
        }
    ]
}
Example-3 Updating a Meeting Topic with an attachment:
- Request Method:
PATCH - Request URL:
/rest/v1.1/projects/{project_id}/meeting_topics/{id} - Request Body:
{
    "meeting_id": 538,
    "meeting_topic": {
        "title": "Updating meeting topic with an upload_id",
        "description": "Updated Description",
        "upload_ids": ["01JNNDN3MVJ57BHA2NQR6R5F8D"]
    }
}
- Response Body
{
    "id": 534,
    "number": "1.4",
    "created_on": "2025-03-06",
    "position": 4,
    "due_date": null,
    "priority": null,
    "status": "Open",
    "title": "Updating as form data key value with an attachment",
    "minutes": null,
    "description": "Updated Description",
    "meeting_category": {
        "id": 202,
        "title": "Uncategorized Items"
    },
    "assignments": [],
    "attachments": [
        {
            "id": 971406,
            "filename": "test_filename",
            "name": "test_filename",
            "url": "http://storage.procore.com/api/v5/files/us-east-1/pro-core.com-staging/companies/2/01JNNDN3MVJ57BHA2NQR6R5F8D?companyId=2&projectId=1&sig=e0179fd949a9a0505f7859be2d23575d01f0dfcc0e4adf320413808581b9c90e"
        }
    ]
}
Migrating from Legacy Uploads
If you’re currently using the legacy upload approach (via attachments or data attributes), we strongly recommend migrating to the upload_id approach. The benefits include:
- Improved upload performance and reliability
- Reduced API request payload sizes
- Better handling of large files
- More consistent behavior across different Procore tools