Exploring the Procore API with Postman
Introduction
Postman is a very popular platform for developing and testing REST APIs. It is a feature-rich application that can run as a Chrome app or natively in Windows or Mac OSX. We recommend Postman as a platform for exploring the Procore API and familiarizing yourself with the various resource endpoints.
Installation
The first step is to get Postman installed on your computer. Because Postman is provided as a Chrome App as well as a native application for Windows and Mac OSX, you will want to pick the installation that best fits your development environment and processes. Visit the Postman website, download the appropriate installation package, and install as instructed. The examples described in this article are based on Postman v5.3.3.
The Postman User Interface
At first glance the Postman user interface may seem complicated and even a little intimidating. Let’s take a moment to break down the various components on the screen, focusing on the main sections that you will be working with.
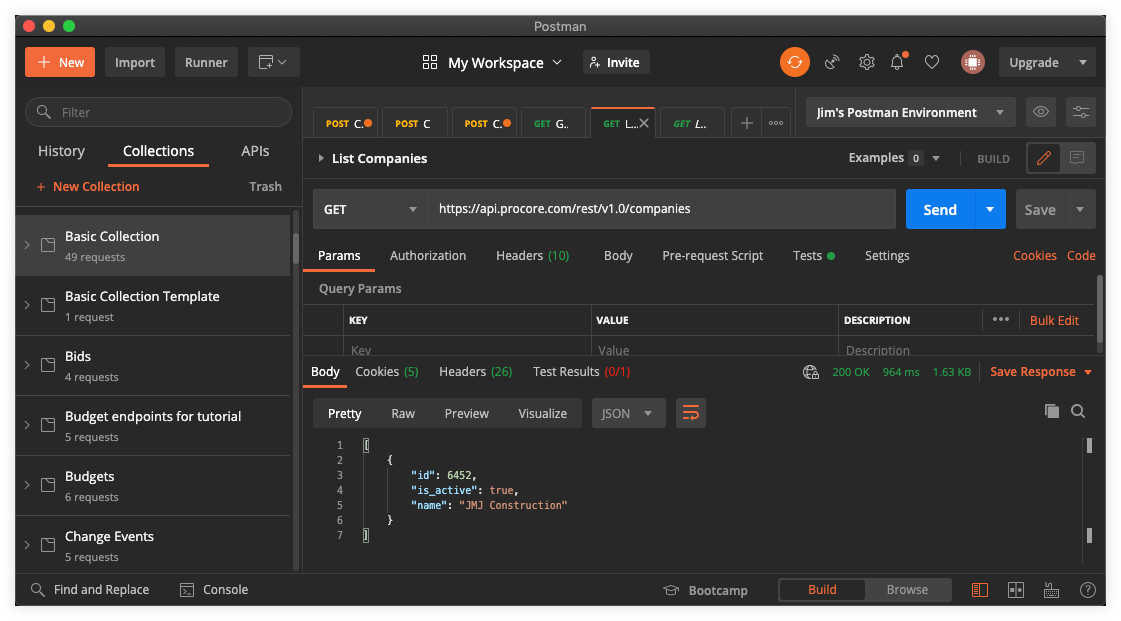
- The left-hand side of the screen provides a navigation pane where you can toggle between a History of all the API calls you run and Collections that let you organize calls into logical groupings.
- In the right-hand portion of the screen is the Request Builder. Use the Request Builder to construct Procore API requests to send to your sandbox environment.
- Using the drop-down in the Request Builder, select the REST Method you want to use with your request. For example, GET, POST, DELETE, etc.
- In the adjacent address bar, enter the URL for the API endpoint that you want to target.
- Use the Params button to open up fields where you can enter query parameters that may be required for a given endpoint.
- Request Headers can also be specified and you can create Header Presets to store frequently used header data such as Content-Type or Authorization keys.
- Use the lower portion of the Request Builder to enter a Request Body.
- The Response Body is also displayed in the lower portion of the screen.
- Finally, use the Send button to initiate the API call in the sandbox environment.
Using Postman with Your Development Sandbox
Getting Started
After you create an App on the Developer Portal you have access to a sandbox environment you can use for development. The development sandbox is pre-poulated with a company and test project. See Sandbox Environments for additional information.
Development Sandbox Credentials
Working in a development sandbox requires using authentication credentials that are separate and distinct from the Procore production environment. The Client ID and Client Secret are unique to your sandbox and are available to use for testing your App in an isolated environment. Keep in mind that these credentials are only valid for your sandbox and are not recognized in the Procore production environment.
Development Sandbox Company Directory Users
In addition to the user account you use to log into the Developer Portal, a minimum set of users is included in the company directory of your development sandbox when it is first generated.
- Test Architect (e.g., sandbox+arch@example.com)
- Test Subcontractor (e.g., sandbox+sub@example.com)
- API Support (e.g., sandbox+demo@example.com)
Development Sandbox Test Project
Your Development Sandbox comes pre-configured with a test project called 1234 - Sandbox Test Project. This project includes the following seed data to help get you started.
- Project Directory - three project users (Test Architect, Test Subcontractor, and API Support as described above)
- Schedule - basic high-level schedule with 8 tasks
- Documents - a basic document folder structure
- Photos - one basic ‘sandbox’ image
- Drawings - a basic set of construction plans
- RFIs - a single RFI record
- Submittals - a single submittal record
Using Environment Variables in Postman
The endpoint descriptors shown in the table above include items enclosed in double curly braces.
The curly brace notation is used to denote Postman environment variables.
You can use environment variables to customize the collection requests to conform to the particular details of your sandbox test project.
For example, you would set the values for the and and variables to match the company and project IDs of your sandbox environment.
Visit Setting Up an Environment with Variables to learn more about using variables in Postman.
The Sandbox Test Project collection includes the following environment variables:
| Variable | Description |
|---|---|
| {{company_id}} | Integer ID for the sandbox company |
| {{project_id}} | Integer ID for the sandbox test project |
| {{drawing_areas}} | Integer ID for drawing area in the sandbox test project |
| {{image_category_id}} | Integer ID for the image category in the sandbox test project |
Generating OAuth 2.0 Tokens in Postman
Background
Postman provides a very handy and user-friendly mechanism for generating and managing OAuth 2.0 access tokens. This alleviates the burden of having to implement a fully fleshed out OAuth 2.0 solution in your application at the outset of your development cycle. Using Postman’s OAuth 2.0 token management tool, you can dive right into making Procore Connect API calls to your sandbox test project with minimal effort. The following sections outline the steps for generating OAuth 2.0 access tokens for the Authorization Code grant type.
What You’ll Need
In order to begin generating OAuth 2.0 access tokens in Postman, you will need the following items:
- Sandbox Client ID for your application
- Sandbox Client Secret for your application
- The Callback URI for your application
- The Authorization endpoint URL for the sandbox environment (https://login-sandbox.procore.com/oauth/authorize)
- The Access Token endpoint URl for the sandbox environment (https://login-sandbox.procore.com/oauth/token)
Generating OAuth 2.0 Tokens
As you will likely use the same access tokens for each of your Postman requests, we recommend configuring authorization for an entire collection rather than individual requests. Here are the steps for configuring OAuth 2.0 authorization for a Postman collection.
-
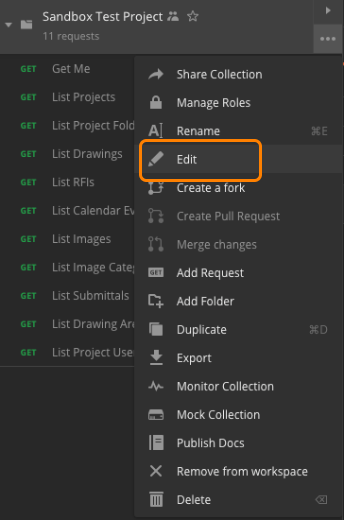
Locate the collection you want to configure authorization for, open the drop-down and choose Edit.
-
In the EDIT COLLECTION dialog, select the Authorization tab.
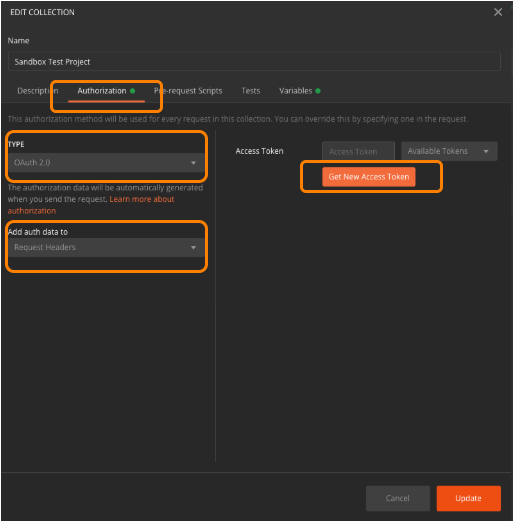
- In the TYPE drop-down, choose OAuth 2.0.
- For the Add auth data to setting, leave the default value of Request Headers.
- Click the Get New Access Token button.
-
Complete the following fields in the GET NEW ACCESS TOKEN dialog.

- Token Name - enter a meaningful name for your access token.
- Grant Type - choose ‘Authorization Code’.
- Callback URL - enter the address for your application’s callback URL as registered in the Developer Portal.
- Auth URL - enter ‘https://login-sandbox.procore.com/oauth/authorize’.
- Access Token URL - ‘https://login-sandbox.procore.com/oauth/token’.
- Client ID - enter the sandbox Client ID for your application as registered in the Developer Portal.
- Client Secret - enter the sandbox Client Secret for your application as registered in the Developer Portal.
- Scope - (n/a) no need to enter a value here.
- State - (n/a) no need to enter a value here.
- Client Authentication - choose ‘Send as Basic Auth header’.
-
Click the Request Access Token button. The Procore login dialog displays.

-
Enter a valid username and password for the Procore account you will be accessing and click OK. The MANAGE ACCESS TOKENS dialog displays.

- Click Use Token, then click Update in the Edit Collection dialog. You are now ready to make API calls from Postman to the Procore API.
REDIRECT URI LIMITATION IN POSTMAN TOKEN MANAGEMENT TOOL
It is important to note that Postman’s token management tool behaves differently when you use
urn:ietf:wg:oauth:2.0:oobas the redirect URI for your test application. The token management tool completes only a partial handling ofurn:ietf:wg:oauth:2.0:oobby displaying an authorization code that you must then use to manually generate an access token. It does not complete the full process of creating and storing an access token within the token management tool.
Procore OAuth 2.0 Postman Collection with cURL Examples
We’ve put together a helpful Postman collection of cURL examples for the Procore OAuth 2.0 Authentication endpoints that you can use while you build, test, and maintain your application. Simply visit this link to view the collection and begin exploring the Procore OAuth 2.0 authentication endpoints. Each endpoint includes an explanation of its functionality along with a pre-formatted cURL example command that you can copy and paste as needed.
Postman Documentation
The Postman documentation website provides complete descriptions of all available features, compelling case studies, and comprehensive training material. Below are a number of links to useful documentation on the Postman website.
- Postman Main Documentation Page
- Sending Requests
- Understanding and Working with Responses
- Getting Started with Collections
- Setting Up an Environment with Variables
And here are some helpful Postman training videos…