OAuth 2.0 Authorization Code Grant Flow
Implement the Authorization Code grant for web apps and installed apps.
Before you start. Confirm Authorization Code is the right grant for your use case in Choose an Authentication Method. For full endpoint parameter reference, see Authentication Endpoints.
Introduction
The Authorization Code grant is a redirection-based flow used when your app accesses Procore data on behalf of a specific Procore user. The user authenticates with Procore, approves your app’s access, and Procore redirects back to your app with an authorization code that you exchange for an access token.
This page covers two variants:
- Standard web flow — for server-side web applications that can handle browser redirects.
- Installed-app flow — for headless apps (cron jobs, scripts, command-line tools) that cannot handle browser redirects.
Both variants use the same endpoints. The only differences are the redirect URI value and how the authorization code is delivered to your app.
Activity Diagram
The diagram below illustrates the interactions between the user, your app, the Procore authentication server, and the Procore API.
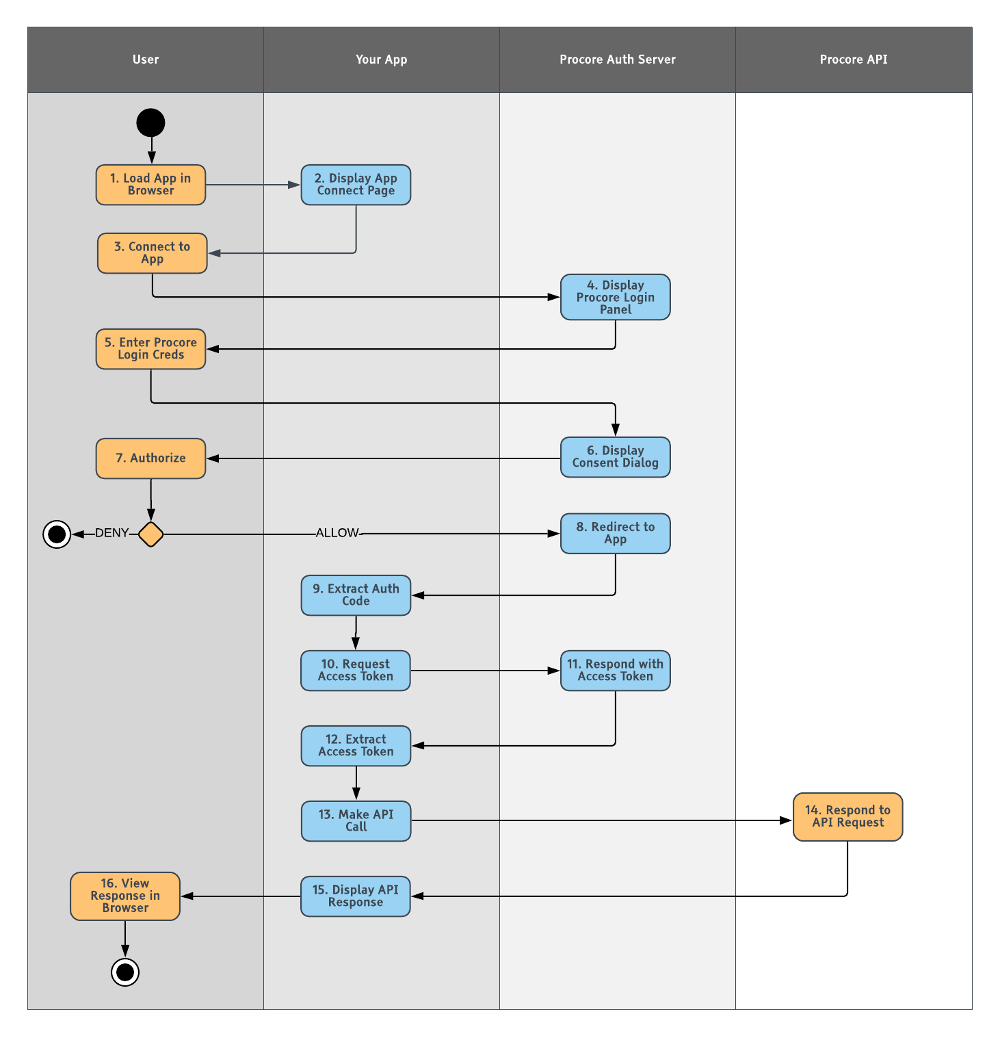
The high-level flow:
- The user opens your app’s web page in a browser.
- Your app shows a “Sign In with Procore” button or similar control.
- The user clicks the control; the browser is redirected to Procore’s authorization endpoint.
- The user logs in to Procore and approves your app’s access.
- Procore redirects back to your app’s redirect URI with an authorization code.
- Your app exchanges the authorization code for an access token via
/oauth/token. - Your app calls Procore APIs using the access token.
Production vs. Sandbox. Access tokens and refresh tokens are not shared between production and sandbox environments. Use the credentials and base URL for whichever environment you’re targeting. The examples below use the production base URL (
https://login.procore.com).
Step 1: Redirect the User to Procore’s Authorization Endpoint
Direct the user to:
GET https://login.procore.com/oauth/authorize?
  client_id=<CLIENT_ID>
  &response_type=code
  &redirect_uri=<REDIRECT_URI>
  &state=<STATE>
Where:
<CLIENT_ID>is your app’s Client ID from the Developer Portal.<REDIRECT_URI>is a URI you registered for your app.<STATE>is a random alphanumeric value (recommended for CSRF protection — see Use the State Parameter for Security).
The user is presented with a Procore login screen. After successful login and approval, Procore redirects to your <REDIRECT_URI> with the authorization code in the query string. The authorization code is single-use and expires in 10 minutes.
Step 2: Exchange the Authorization Code for an Access Token
POST to /oauth/token with the authorization code:
curl -F grant_type=authorization_code \
     -F client_id=<CLIENT_ID> \
     -F client_secret=<CLIENT_SECRET> \
     -F code=<AUTHORIZATION_CODE> \
     -F redirect_uri=<REDIRECT_URI> \
     -X POST https://login.procore.com/oauth/token
A successful response returns an access token and a refresh token:
{
  "access_token": "eyJ0eXAiOiJKV1QiLCJhbGciOiJFUzUxMiJ9...",
  "token_type": "bearer",
  "expires_in": 5400,
  "refresh_token": "76ba4c5c75c96f608...",
  "created_at": 1484786897
}
Save the refresh_token securely — you’ll need it to renew the access token.
Step 3: Call the Procore API
Include the access token in the Authorization header on every API call:
curl -H "Authorization: Bearer <ACCESS_TOKEN>" \
     -X GET https://api.procore.com/rest/v1.0/me
Refreshing the Access Token
The access token expires after 1.5 hours (5400 seconds). To renew it, POST to /oauth/token with the refresh token:
curl -F grant_type=refresh_token \
     -F client_id=<CLIENT_ID> \
     -F client_secret=<CLIENT_SECRET> \
     -F refresh_token=<REFRESH_TOKEN> \
     -F redirect_uri=<REDIRECT_URI> \
     -X POST https://login.procore.com/oauth/token
The response includes a new access_token and a new refresh_token. The previous refresh token is invalidated as soon as it’s used. Always save the new refresh token from each response.
Use the State Parameter for Security
The OAuth 2.0 specification recommends the state parameter to mitigate Cross-Site Request Forgery (CSRF) attacks. CSRF is an exploit in which an attacker causes the user-agent of an end-user to follow a malicious URI to a trusting server.
Pass an arbitrary alphanumeric value for state on the authorization request. The Procore authorization server returns the same value as a query parameter on the redirect back to your app. Verify that the returned state matches the value you sent — an attacker won’t be able to predict your value, so a mismatch indicates a forged or replayed request.
Including state is not required, but is strongly recommended.
Installed-App Variant (No Browser Redirect)
If your application is an installed application without a browser (cron jobs, scripts, command-line tools), it cannot handle the browser redirect. Use these modifications:
Set the Redirect URI to OOB
When registering your app, set the redirect URI to:
urn:ietf:wg:oauth:2.0:oob
This signals the Procore authorization server to display the authorization code on a Procore-hosted page rather than redirect to your app. The user copies the code and pastes it into your application.
Step 1 (Modified): Display the Authorization URL to the User
Have the user manually open the authorization URL in a browser:
https://login.procore.com/oauth/authorize?
  response_type=code
  &client_id=<CLIENT_ID>
  &redirect_uri=urn:ietf:wg:oauth:2.0:oob
After the user logs in and approves your app, Procore displays the authorization code on a page:
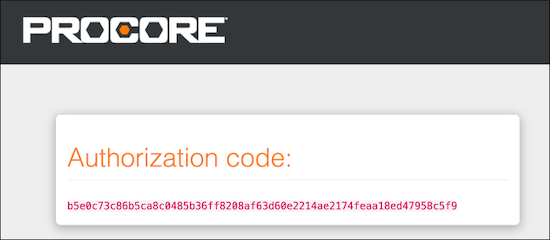
The user copies the code and pastes it into your application.
Steps 2 and 3 Are Identical
Use the same /oauth/token exchange and the same Authorization: Bearer API calls as the standard flow.
Authenticating Without User Interaction After Initial Setup
The initial authorization requires a one-time user interaction (logging in and pasting the authorization code). After that, your installed app can authenticate programmatically using the refresh token:
- The refresh token does not expire on a fixed schedule — it remains valid until used to acquire a new pair of tokens.
- Each refresh response returns a new access token AND a new refresh token. Save both.
- As long as your app refreshes before the access token expires (1.5 hours), no further user interaction is needed.
Additional Resources
- Most languages have OAuth 2.0 client libraries that wrap the request/exchange logic. See the OAuth 2.0 client libraries directory.
- Authentication Endpoints — full parameter reference for
/oauth/authorize,/oauth/token,/oauth/token/info, and/oauth/revoke. - OAuth Credentials Management — where to find Client ID and Client Secret in the Developer Portal.