Building Embedded Applications
Build an app that runs inside Procore's UI — as a full screen workspace or a contextual side panel.
Overview
Embedded apps run directly within the Procore user interface, keeping users in context and reducing app switching. They are defined using the Procore App Manifest and configured through the Developer Portal’s Configuration Builder.
Procore supports two embedded placements:
- Full Screen — occupies the main content area. Users launch it from the Apps menu in the top-right of Procore, available at both the Company and Project level.
- Side Panel — renders in a fixed 400-px panel on the right side of the UI, scoped to specific tools and views. Users launch it from the dock on the right edge of the interface.
You can add one or both to a single app. To get started, first create a Developer Portal account and app.
Add a Full Screen Component
Full screen apps require a URL to define which page appears in the Procore UI.
- In the Configuration Builder on the Manage App page, expand the Components section and click Add Component.
- From the drop-down list, select Full Screen for the Type.
- In the URL field, enter the base web address for your application (e.g.,
https://example.com/1234/12). - (Optional) Add dynamic URL parameters so your app adapts to each company, project, or install. See Understanding URL Parameter Interpolation.
- Click Save Component.
Add a Side Panel Component
- In your Developer Portal app, expand the Embedded Components section.
- Click Add Component.
- For Type, select Side Panel.
- In the URL field, enter your app’s base web address (e.g.,
https://example.com/1234/12). - Select from the supported Side Panel Views.
- Use the Side Panel Views menu to select one or more tools and views where your app will be accessible.
- (Optional) Add dynamic URL parameters so your app adapts to each company, project, or install. See Understanding URL Parameter Interpolation.
- Click Save Component.
For the full list of supported view keys and URL patterns, see the Side Panel View Key Reference.
Access Procore Context Side panel apps can read the Procore context they're running in — company, project, resource, and view — using the MessageEvent interface and Window.postMessage(). Expand for the fields and setup code.
The data fields retrieved from a message event sent by the parent window include:
- Company ID =
event.data.context.company_id - Project ID =
event.data.context.project_id - Resource ID =
event.data.context.id - View =
event.data.context.view
Add an event listener to your page and use postMessage to initialize communication with the parent window. Note the conditional statements that account for Multiple Procore Regions — account for all regions where your app needs Procore context, and update this code as new regions become available.
window.addEventListener('message', (event) => {

  const obj = event.data;
  if (obj.type === "setup") {
    const company_id = obj.context.company_id;
    const project_id = obj.context.project_id;
    const view = obj.context.view;
    const resource_id = obj.context.id;
  }
});

if (document.referrer === "https://app.procore.com/") {
  window.parent.postMessage({ type: 'initialize' }, "https://app.procore.com/");
}
if (document.referrer === "https://us02.procore.com/") {
  window.parent.postMessage({ type: 'initialize' }, "https://us02.procore.com/");
}
if (document.referrer === "https://uk01.procore.com/") {
  window.parent.postMessage({ type: 'initialize' }, "https://uk01.procore.com/");
}
Always set the targetOrigin parameter of postMessage to the specific, fully-qualified origin of the parent window to ensure the best security.
Supported Message Events Beyond the initial setup event, Procore fires postMessage events across the side panel app's life cycle — visible, hidden, and destroy. Expand for the event types and a listener example.
Aside from the setup event fired when your app starts, additional events fire at different points in the side panel app’s life cycle. All are sent as postMessages from Procore to your app’s window. Listen for message events and filter by the data type.
window.addEventListener('message', (event) => {
  const obj = event.data;
  if (obj.type === "sidepanel:app:visible") {
    // Do something when the app is visible.
  }
  if (obj.type === "sidepanel:app:hidden") {
    // Do something when the app is hidden but still running.
  }
  if (obj.type === "sidepanel:app:destroy") {
    // Do something when the app is about to be removed from the DOM.
  }
});
Define Setup Instructions and Post‑Installation Notes
You must provide setup instructions and post-installation notes to help Procore users complete the installation and setup of your application in a Procore project.
Clear post-installation guidance is required to ensure users know exactly what to do after installing your app. For example, they may need to sign up for an external account, configure settings on your platform, or complete authentication steps before the app can be used.
These instructions are displayed to the user immediately after installation and remain accessible in the App Management section of the Procore Admin Tool.
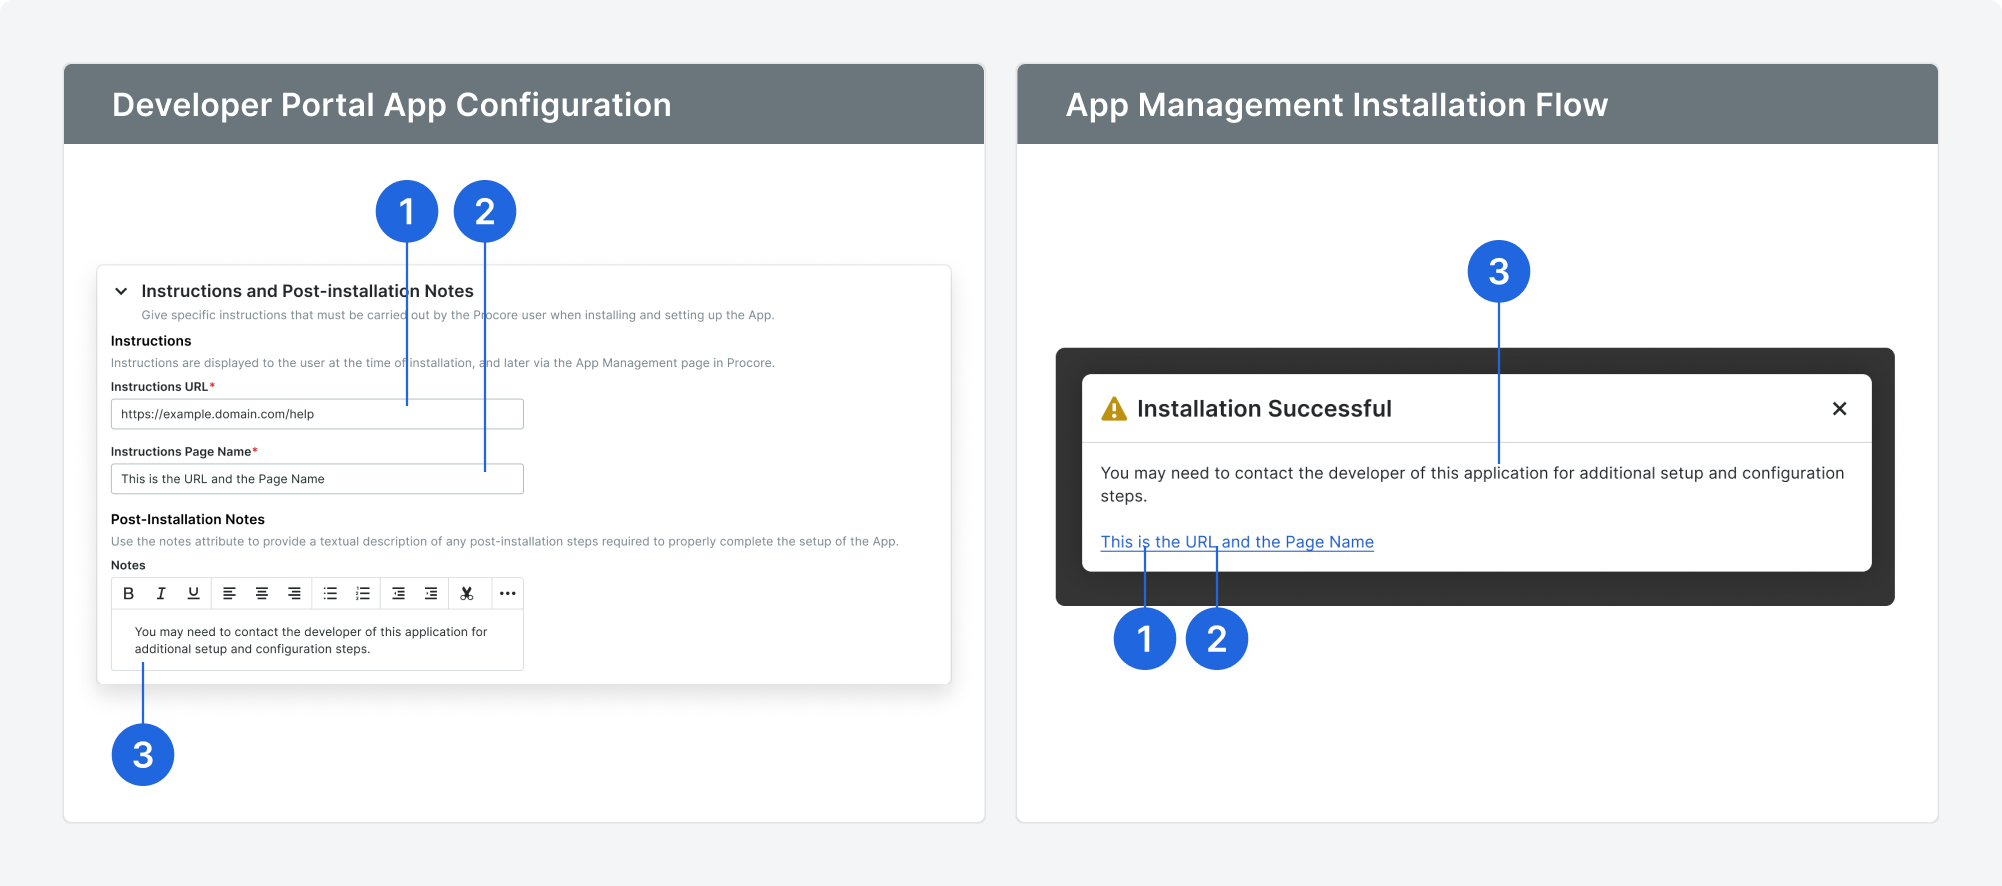
To populate the install notes, expand the Instructions and Post-Installation Notes section, and follow these steps to define setup instructions:
- In the Instructions URL field, enter a link to your company’s support site or a page with step-by-step setup instructions.
- In the Instructions Page Name field, enter the label you want to display as the hyperlink text for the Instructions URL.
- In the Post-Installation Notes field, add any additional details or reminders the users need to complete setup successfully.
Create the Initial App Manifest Version
After configuring your component(s), save your App Manifest and create a version.
- Click Save at the top of the page.
- Click Create Version.
- Enter a semantic version number (e.g.,
0.1.0). Versions must be three integers separated by dots (x.x.x).- For details, see App Versioning & Production.
- Click Create.
The version is saved with the status Ready for Testing. As you continue development, click Save Version to capture new changes.
Test and Validate in Your Developer Sandbox
Test each version of your app in your Developer Sandbox before promoting it to production. See Install a Version in Your Developer Sandbox.
Promote to Production
Once you’re satisfied with testing, promote your sandbox version to production. See App Versioning & Production to learn how.